前两篇文章介绍了C++和Go中利用TCP Option中的时间戳实现计算网络时延。基于“用Rust重写一切”的哲学,今天我们来看看Rust中如何做这个事情。夜深人静,再肝一篇关于网络编程的文章。
Rust中还没有和 gopacket一样功能强大的包,它的pcap用来捕获网络包没有问题,但是缺乏解析的能力,所以我们使用另外一个包pdu来实现网络包的解析。
当然rust生态圈中还有其他的包捕获库如pnet、包解析库如etherparse等,但是我选择了pcap和pdu,因为针对这篇文章的场景,它们用起来很顺手。
为了简单起见,我们不像前两篇文章那样的程序那么复杂,还要解析参数,针对参数做不同的处理,这次Rust实现的程序中,我们主要实现其最核心的功能:
- 捕获 TCP 包
- 解析TCP选项中的时间戳
- 计算时延
我是在Mac mini的进行开发和运行的,理论在Linux上也是可以运行的。
你可能需要安装libpcap库。
Mac上可能你需要临时设置权限,才有可能正常运行程序:
1
| sudo chmod 666 /dev/bpf*
|
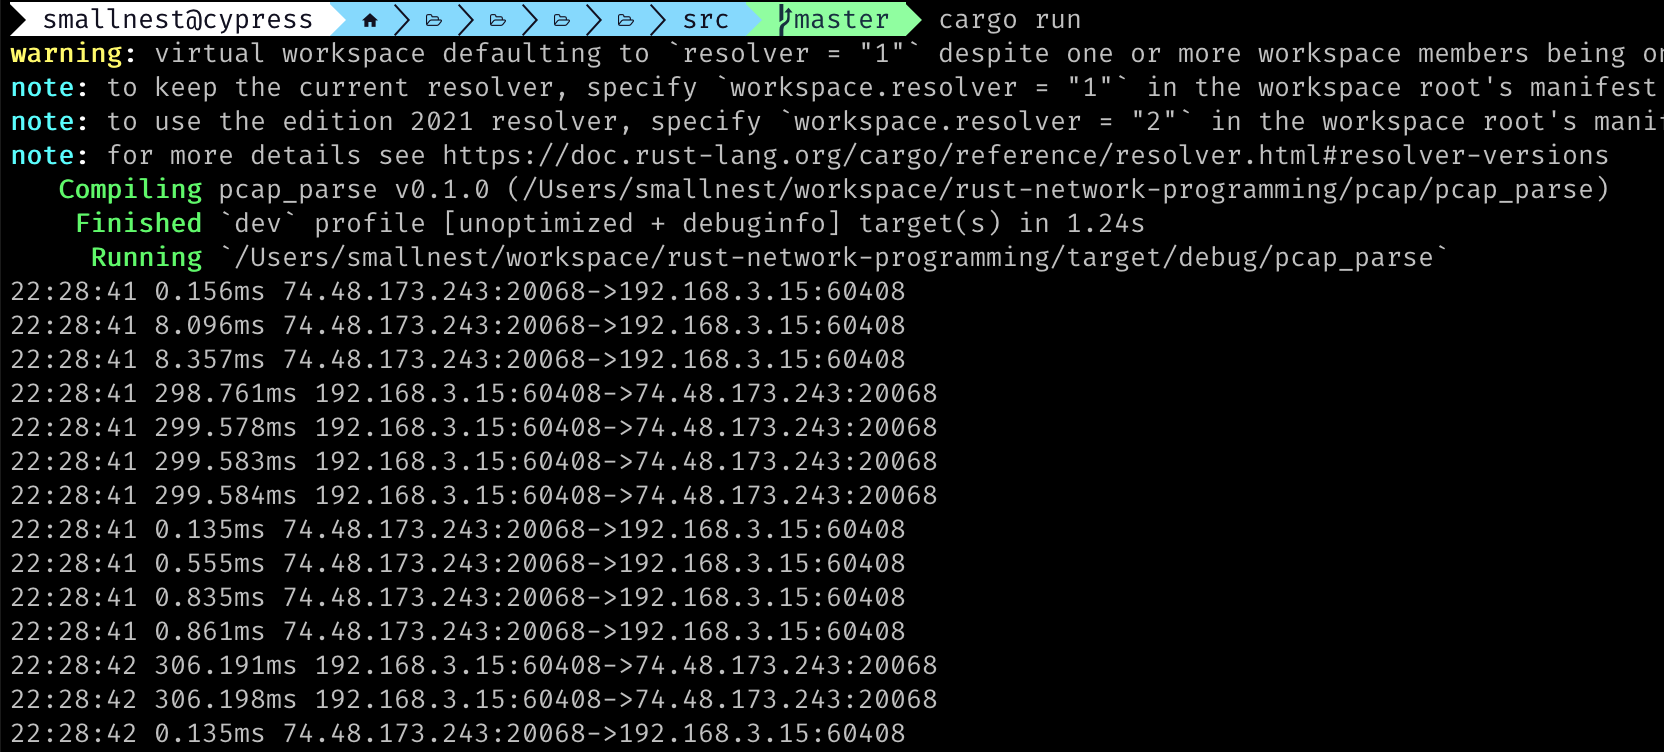
首先看看程序运行的效果:
那么程序一开始,我们开始要使用pcap捕获包:
1
2
3
4
5
6
7
8
9
10
11
12
13
14
15
16
17
18
19
20
21
22
23
24
25
26
27
28
29
30
| use std::net::{Ipv4Addr,Ipv6Addr};
use std::ops::Sub;
use std::time::{Duration, UNIX_EPOCH};
use chrono::{DateTime, Local};
use macaddr::MacAddr;
use pcap;
use pdu::*;
use libc;
fn main() {
let mut map = std::collections::HashMap::new();
let mut cap = pcap::Capture::from_device("en1")
.unwrap()
.immediate_mode(true)
.open()
.unwrap();
while let Ok(packet) = cap.next_packet() {
......
}
}
|
目前我们只能得到捕获的包信息,包括pcap增加的头信息(捕获时间、包长度等)和包的数据。
我们需要解析包的数据,得到TCP包,然后解析TCP选项中的时间戳。目前pcap不能帮助我们了。
我们在那个while循环中一步一步补充省略的代码:
1
2
3
4
5
6
7
8
9
10
11
12
13
14
15
16
17
18
19
20
21
22
23
24
25
26
27
28
29
30
31
32
33
34
35
36
37
| let ethernet = EthernetPdu::new(&packet.data).unwrap();
let _src_mac = MacAddr::from(ethernet.source_address());
let _dst_mac = MacAddr::from(ethernet.destination_address());
let ei = ethernet.inner();
let (src_ip,dst_ip, tcp) = match ei {
Ok(Ethernet::Ipv4(ref ip)) => {
let src_ip = Ipv4Addr::from(ip.source_address()).to_string();
let dst_ip = Ipv4Addr::from(ip.destination_address()).to_string();
let tcp = match ip.inner() {
Ok(Ipv4::Tcp(tcp)) => Some(tcp),
_ => None
};
(src_ip,dst_ip,tcp)
}
Ok(Ethernet::Ipv6(ref ip)) => {
let src_ip = Ipv6Addr::from(ip.source_address()).to_string();
let dst_ip = Ipv6Addr::from(ip.destination_address()).to_string();
let tcp = match ip.inner() {
Ok(Ipv6::Tcp(tcp)) => Some(tcp),
_ => None
};
(src_ip,dst_ip,tcp)
}
_ => (String::new(),String::new(),None)
};
......
|
首先解析出ethernet层,和gopacket调用方法不同,但是一样很简洁。
ethernet中包含源目的Mac地址,如果你需要,你可以调用相应的方法获取它们。本程序不需要这两个信息,忽略即可。
接下来解析IP层,这会涉及到ipv4和ipv6两种情况,我们分别处理。
1
2
3
4
5
6
7
8
9
10
11
12
13
14
15
16
17
18
19
20
21
22
23
24
25
26
27
28
29
30
31
32
| let ei = ethernet.inner();
let (src_ip,dst_ip, tcp) = match ei {
Ok(Ethernet::Ipv4(ref ip)) => {
let src_ip = Ipv4Addr::from(ip.source_address()).to_string();
let dst_ip = Ipv4Addr::from(ip.destination_address()).to_string();
let tcp = match ip.inner() {
Ok(Ipv4::Tcp(tcp)) => Some(tcp),
_ => None
};
(src_ip,dst_ip,tcp)
}
Ok(Ethernet::Ipv6(ref ip)) => {
let src_ip = Ipv6Addr::from(ip.source_address()).to_string();
let dst_ip = Ipv6Addr::from(ip.destination_address()).to_string();
let tcp = match ip.inner() {
Ok(Ipv6::Tcp(tcp)) => Some(tcp),
_ => None
};
(src_ip,dst_ip,tcp)
}
_ => (String::new(),String::new(),None)
};
if tcp.is_none() {
continue;
}
let tcp = tcp.unwrap();
|
调用inner方法就可以得到IP层的信息,我们处理ipv4和ipv6两种情况,分别获取源目的IP地址和TCP层这三个数据。
因为一开始我们没有设置filter,所以这里捕获的包很多,比如UDP的包、ARP的包,我们在这里检查包是否是TCP包,如果不是,我们忽略这个包。当然最好是一开始就设置filter,性能会更好。
接下来我们解析TCP选项中的时间戳:
1
2
3
4
5
6
7
8
9
10
11
12
13
14
15
16
| let ts = tcp.options().find_map(|option| {
match option {
TcpOption::Timestamp{val,ecr} => {
Some((val, ecr))
}
_ => None
}
});
if ts.is_none() {
continue;
}
if ts.unwrap().1 == 0 && !tcp.syn(){
continue;
}
|
pdu库的好处是方便解析TCP以及它的选项。TCP的选项可能有好几个,我们只match时间戳的那个,得到时间戳的值和echo reply的值。
接下来我们处理数据。首先根据五元组和tval为key,将这个flow的信息存储到map中:
1
2
3
4
| let key = format!("{}:{}->{}:{}-{}", src_ip, tcp.source_port(),dst_ip,tcp.destination_port(),ts.unwrap().0);
if !map.contains_key(key.as_str()) {
map.insert(key, packet.header.ts);
}
|
然后我们找反向的key,如果存在,就说明有去向,当前处理的是回向,我们计算两个捕获的值的差,就是时延:
1
2
3
4
5
6
7
| let reverse_key = format!("{}:{}->{}:{}-{}", dst_ip, tcp.destination_port(),src_ip,tcp.source_port(),ts.unwrap().1);
if map.contains_key(reverse_key.as_str()) {
map.get(reverse_key.as_str()).map(|ts| {
let rtt = timeval_diff_str(ts,&packet.header.ts);
println!("{} {} {}:{}->{}:{}", timeval_to_current_time_str(&packet.header.ts), rtt,dst_ip, tcp.destination_port(),src_ip,tcp.source_port());
});
}
|
当然为了避免map中的数据越积越多,我们可以定期清理一下,这里我们根据map中的元素的数量决定要不要清理:
1
2
3
4
5
6
7
8
| if map.len() > 10_000 {
map.retain(|_,v| {
let now = std::time::SystemTime::now();
let duration = now.duration_since(UNIX_EPOCH).unwrap();
let ts = Duration::new(v.tv_sec as u64, v.tv_usec as u32 * 1000);
duration.sub(ts).as_secs() < 60
});
}
|
然后补充两个计算时间的辅助程序,这就是这个程序的全部代码了:
1
2
3
4
5
6
7
8
9
10
11
12
13
14
15
16
17
18
19
20
21
22
23
24
25
26
27
28
29
| fn timeval_to_current_time_str(tv: &libc::timeval) -> String {
let secs = tv.tv_sec as u64;
let nsecs = (tv.tv_usec as u32 * 1000) as u64;
let duration = UNIX_EPOCH + std::time::Duration::new(secs, nsecs as u32);
let datetime = DateTime::<Local>::from(duration);
datetime.format("%H:%M:%S").to_string()
}
fn timeval_diff_str(start: &libc::timeval, end: &libc::timeval) -> String {
let secs = end.tv_sec as i64 - start.tv_sec as i64;
let usecs = end.tv_usec as i64 - start.tv_usec as i64;
let (secs, usecs) = if usecs < 0 {
(secs - 1, usecs + 1_000_000)
} else {
(secs, usecs)
};
format_duration(secs, usecs as u32)
}
fn format_duration(secs: i64, usecs: u32) -> String {
let duration = secs * 1_000_000 + usecs as i64;
match duration {
0..=999_999 => format!("{:.3}ms", duration as f64 / 1_000.0),
_ => format!("{:.6}s", duration as f64 / 1_000_000.0),
}
}
|
你对Rust实现的 pping 有什么看法,欢迎在评论区留下你宝贵的意见。
